I don’t really enjoy my birthday. My birthday is in December, very close to Christmas, and it usually gets forgotten. Yup, it’s sad.
What I do like about my birthday is getting free stuff! When I lived in the US, every year I’d get an email from Starbucks – “Happy birthday, the coffee is on us today!” – and I always got that free coffee. Always.
Want to do something to earn your customer’s loyalty? Use the automation powers in your HubSpot account to do something that makes them feel good and shows them you care! I’m going to show you how to add a birthday field to HubSpot, and give you some ideas for what to do with it once you have it.
1. Create a custom property
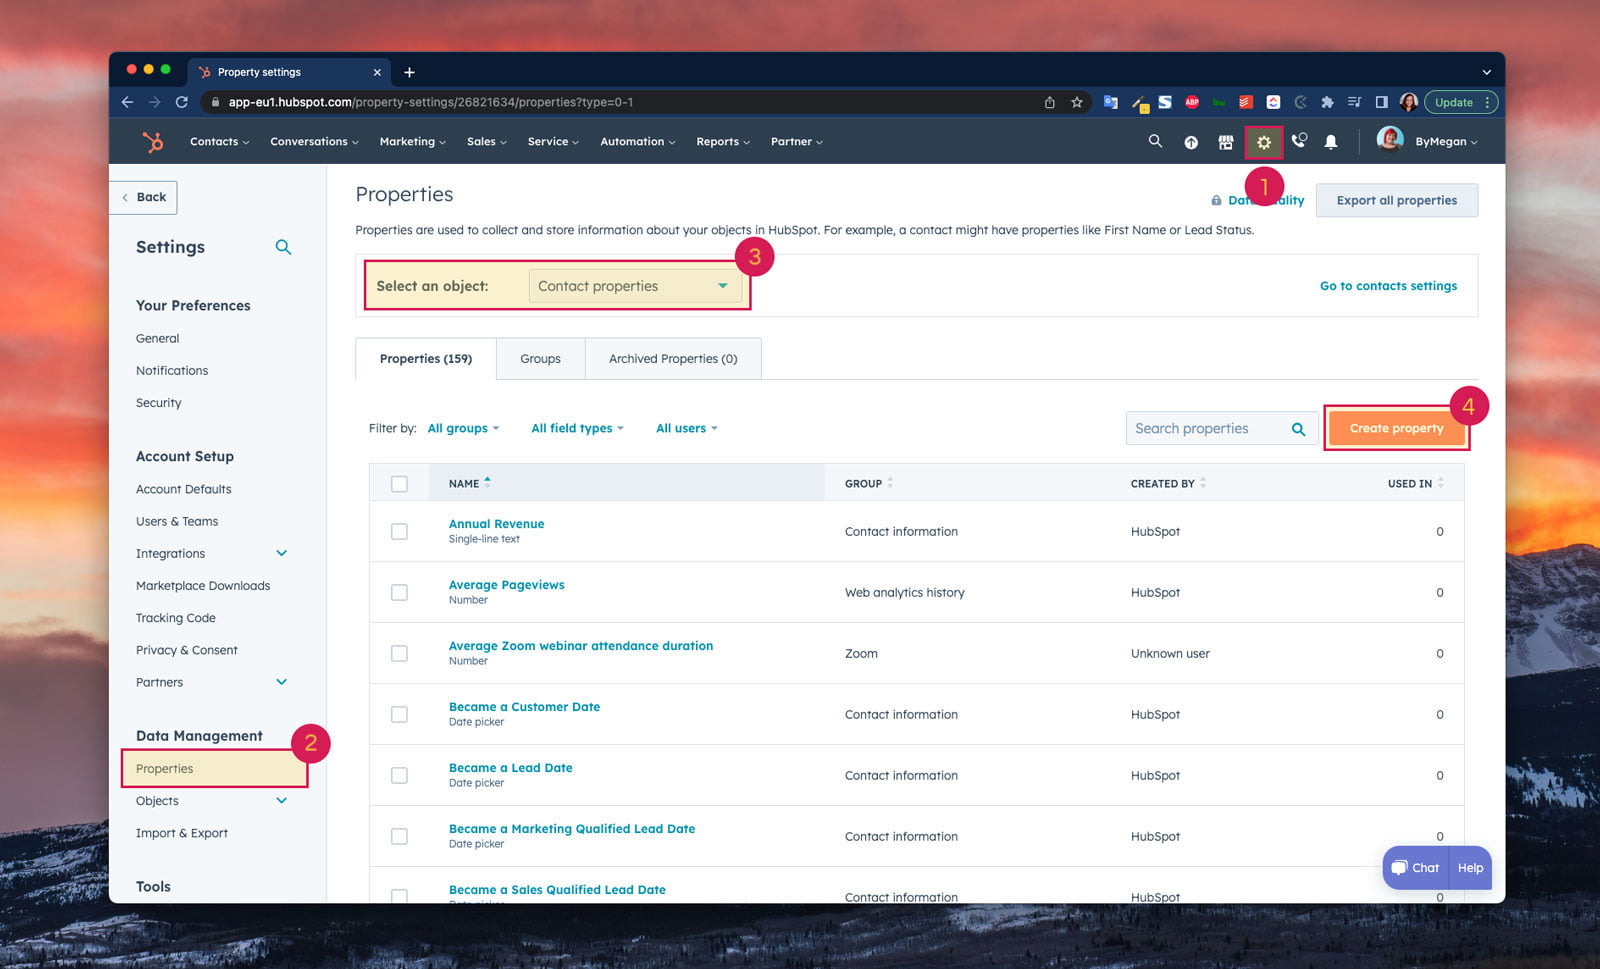
First, head over to your HubSpot account. Smash the cog icon in the upper right corner to bring up your settings. Once you’re there, find “Properties” in the column on the left.
Here you will find all the Properties that exist in your account for all your different types of Objects (contacts, companies, deals, and so on). Now, tap that orange button on the right that says “Create property”.
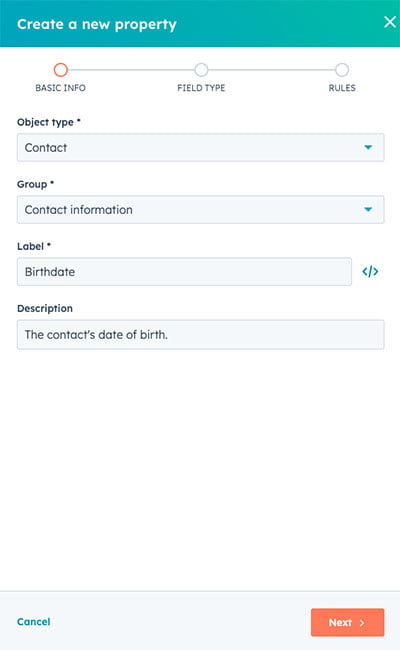
You will define the specifics for your new property in the box that opens up on the right side of your screen, which has three sections: basic info, field type, and rules. You can enter anything you like here. Keep in mind that others will need to understand the field, so be as clear as possible with the name and description.
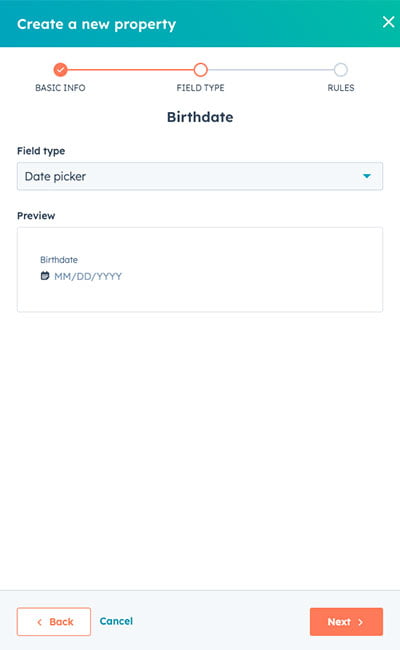
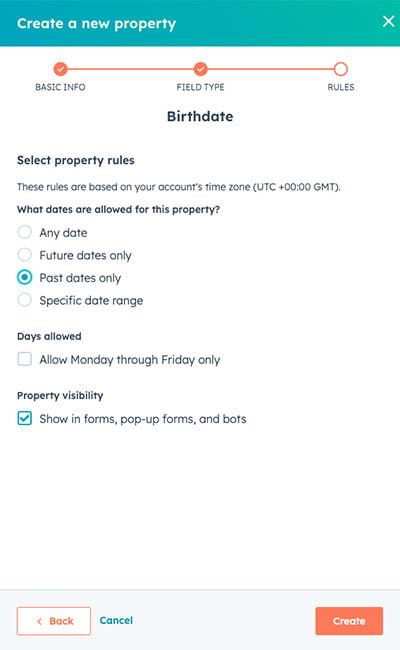
For the field type, be sure to select “Date picker”, because the information you want to collect is a date.
For those that want a deeper dive, below is an explanation for each field, the information I've entered, and my reasoning behind each decision.
Choose Contact. A birthdate belongs to one individual human, so the data we want to capture is specific to an individual contact. So, our object here is a Contact.
A property group is simply a collection of properties that you have categorized. The most relevant choice from the default options is Contact information. If you would like, you can set up a custom group instead.
Birthdate. This is the name of your property, and how you will find it in the future, so choose something that makes sense to you and your team. Other options would be “Birthday” or “Date of Birth”.
The contact’s date of birth. This is my quick and easy description, but you can be as detailed or as concise here as you like.
Pro tip: If you have a use case in mind, add that to the end. Something like “Used to send an promo code on the customer’s birthday.” This can serve as a helpful reminder for your whole team.
Date picker. This ensures an acutal date is chocen No other option will work if you want to automate around the selected date.
This section isn’t required, but it can be very useful. I’ve set the Past dates only rule, to ensure that the date entered is formatted correctly.
For property visibility, Show in forms, pop-up forms, and bots is selected. This means we’ll be able to ask for a contact’s birthday through a form submission, like a new customer form. If you want this field to be private, you can uncheck the box and it will still be available to all your teammates within HubSpot.
Once you finish the last section tap “Create”, and you’re done creating your new property. Congratulations! You have successfully added a birthday field to HubSpot. Now you can use this new field to keep track of your contacts’ birthdays and use that information to send personalized messages and offers.
2. Plan Your Automation
You created a place to store your data, but that data is a little pointless unless you do something with it. Luckily, it’s pretty easy to automate the next steps with HubSpot. To get started, you’ll first need to decide what you want to do with this data. I recommend that you choose a direction that matches your business goals and brings a little joy to your customers. To help you decide on what to do with your fancy new property, here are some ideas:
- Automatically send a simple, personalized “Happy Birthday” note on your customer’s birthday.
- Schedule an internal notification for your team before the customer’s birthday, so you can send them something special.
- Send your customers a birthday-only coupon or promo code.
- Offer a promotional deal like free shipping or a free item in their next order.
Once you decide, your next step is to map out the steps to getting it done, so you’ll know all the components of your automation path and have clear next steps. To show you an example, I’m going to map out your path for the first option, sending a simple note on your customer’s birthday.
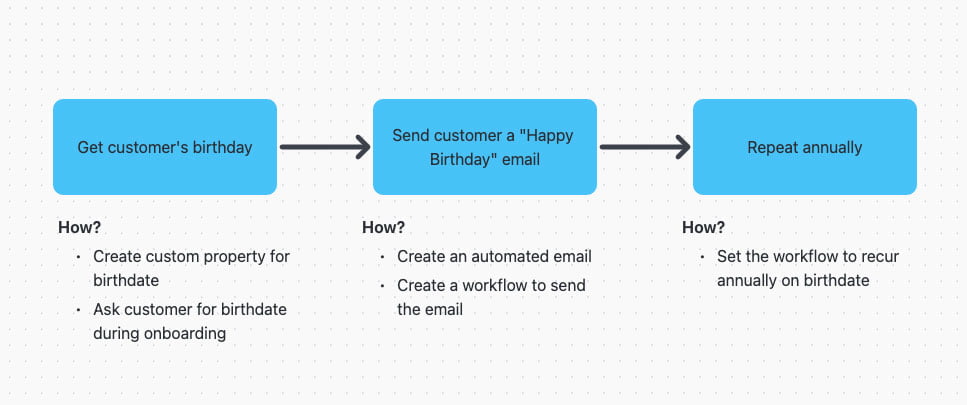
Let’s go through the steps in our process one by one.
First, we need to get our customer’s birthday. The easiest way to do this would be to include your custom property for their birthdate in an existing onboarding form. This might be the form they use to sign up for an account, or part of a set of questions your sales team asks during your customer onboarding process. This is an often overlooked step, but since you need this data to automate your process, it’s crucial!
Next, we will send the customer a personalized email that says “Happy Birthday”. Our plan tells us some key information that will determine how we build that email. The email must be:
- A marketing email
(only marketing emails can be automated through a workflow) - Automated
(sent through a workflow) - Personalized
(use personalization tokens like first name)
Our last step in the process is to send the email again on their next birthday. To do this, we’ll make sure that the workflow we create is automated based on a date property – our custom “birthdate” property we created earlier.
Clear as mud? Great. Let’s get to work.
3. Build Your Components
Create Your "Happy Birthday" Email
When I create automated processes, I like to work backwards. If I’m creating a workflow, I’ll create all the pieces needed for that workflow before I actually build the workflow itself. We already have our custom birthday property, so now let’s create the email we want to send. Follow these steps:
- In HubSpot, find Email in the top bar. You’ll find it in the Marketing dropdown.
- Click the orange button on the right that says “Create email”.
- Choose “Automated”.
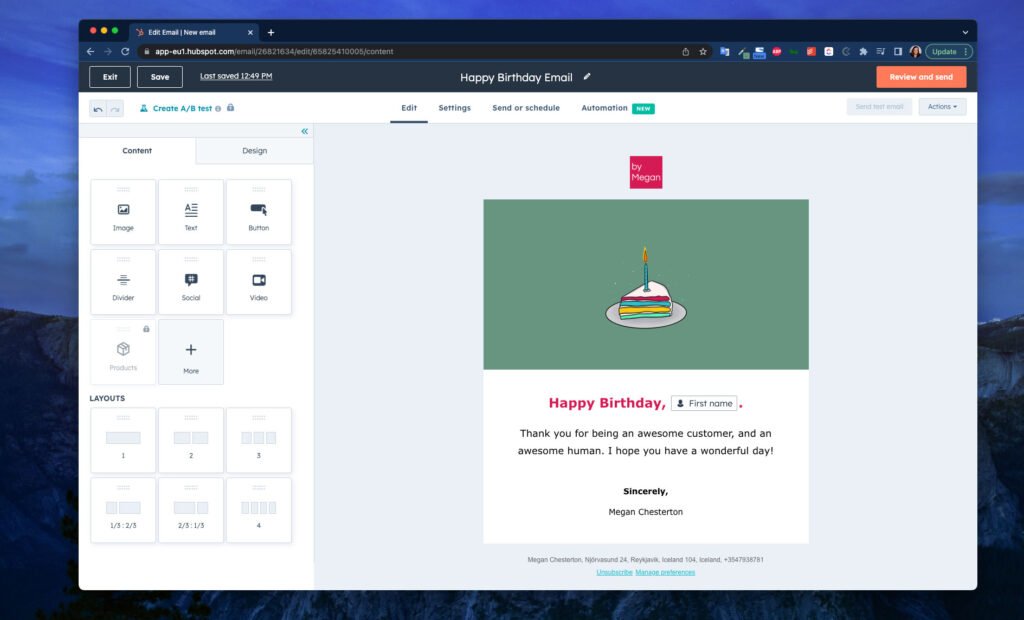
- Select the template you’d like to use for your email. I recommend using the drag and drop editor. If you don’t have any email templates yet, there’s a “Birthday” email template from HubSpot you can use as a starting point! It’s under the “More” section.
- Edit your email. Make sure you use some personalization tokens like first name to make the email more delightful!
- Go through the settings and make sure to update the from name, address, subject line and preview text. I recommend setting the from name to the contact’s owner by selecting “Insert personalization token” and choosing the property, “Contact owner”.
- Finish your email by hitting the “Review and publish” button in the top right. This will not send your email, but it will make your email available to the workflow you are going to create next.
Create Your Workflow
Now that you have an email to send, let’s put together a workflow to send it on your contact’s birthday.
- Go to the Workflows section in HubSpot – found in the top bar under “Automation”.
- Click on the orange “Create workflow” button in the top right and select “From scratch” in the dropdown.
- Choose “Contact date property” from the options, and select your custom birthday property you created earlier in the dropdown that appears.
- If you see a pop-up telling you to try delay until date action, hit no thanks and continue. You’ll see your new workflow.
- Before you do anything else, make sure to click into the box at the very top and give your workflow an appropriate name.
- At the very top, you’ll want to choose some triggers that will act as your rules for the workflow. If you want to send the Happy Birthday emial to everyone in your database where you have the info – just leave this as is. If you want to limit it strictly to your customers – this is where you’d set that rule. For that example, here you would choose filter type “Contact properties” and then set it to only include “Lifecycle stage” is any of “Customer”. Now the workflow will only trigger for those contacts.
- Now find the “Specify a date” action and click into it. In the box that appears on the right side, check “recur annually” and save that change. This will make sure your workflow sends your Happy Birthday email every year on your customer’s birthday, instead of only firing once.
- Click on the delay box and set the time to whenever you like – this will tell the workflow what time it should complete the actions you set. Choose a good time to send the email – I recommend mid-morning, maybe 10am.
- Click on the plus sign at the bottom (before the “end” label) to add a new action. Choose “send email” from the list of options that appears.
- In the dropdown, select your email.
- Head over to the setting tab and check through the options. You may want to assign a campaign name or set up rules for removing folks from the workflow. This part is really up to you.
- Hit publish and you are done!
Congratulations, you now have birthday field in Hubspot and an automatic email that sends your customers a little bit of joy on their birthday!